
If you’re planning a rock and roll theme party, you’ve gotta have food that amps up the vibe. From savory snacks to sweet treats, these 25 food ideas will make your celebration feel like a legendary gig. Get ready to serve up dishes that are as fun and exciting as the music itself!
Rock And Roll Charcuterie Board – A Music-Themed Spread Of Snacks

Creating a Rock and Roll Charcuterie Board is a fun way to celebrate your love for music while indulging in delicious snacks. This themed spread combines a variety of meats, cheeses, fruits, and crunchy bits, all arranged to resemble a lively music scene. It’s not only visually appealing but also offers a delightful mix of flavors that will keep guests coming back for more.
Assembling this board is simple and allows for creativity, making it an enjoyable task for anyone. You can choose your favorite ingredients and arrange them in a way that reflects your unique taste. Whether it’s for a party or just a casual get-together, this charcuterie board sets the perfect vibe.
Ingredients
- 1 cup assorted cheeses (cheddar, gouda, blue cheese)
- 1 cup deli meats (salami, prosciutto, pepperoni)
- 1/2 cup olives (green and black)
- 1 cup mixed nuts (almonds, walnuts, pecans)
- 1 cup crackers (variety of shapes and sizes)
- 1 cup fresh fruits (grapes, berries, apple slices)
- 2-3 small dishes for dips (hummus, guacamole, or salsa)
- Edible decorations (music-themed picks, mini vinyl records)
Instructions
- Start with a large platter or wooden board as your base.
- Begin by placing the cheeses in different sections of the board, cutting some into fun shapes if desired.
- Next, arrange the deli meats artfully, folding or rolling them for texture.
- Add small bowls for your dips, placing them strategically to balance the layout.
- Fill in gaps with olives, nuts, and crackers to create a colorful and inviting spread.
- Finally, add fresh fruits for a pop of color and sweetness, and finish with your fun edible decorations.
Guitar-Shaped Sandwiches – Rockstar-Themed Finger Foods
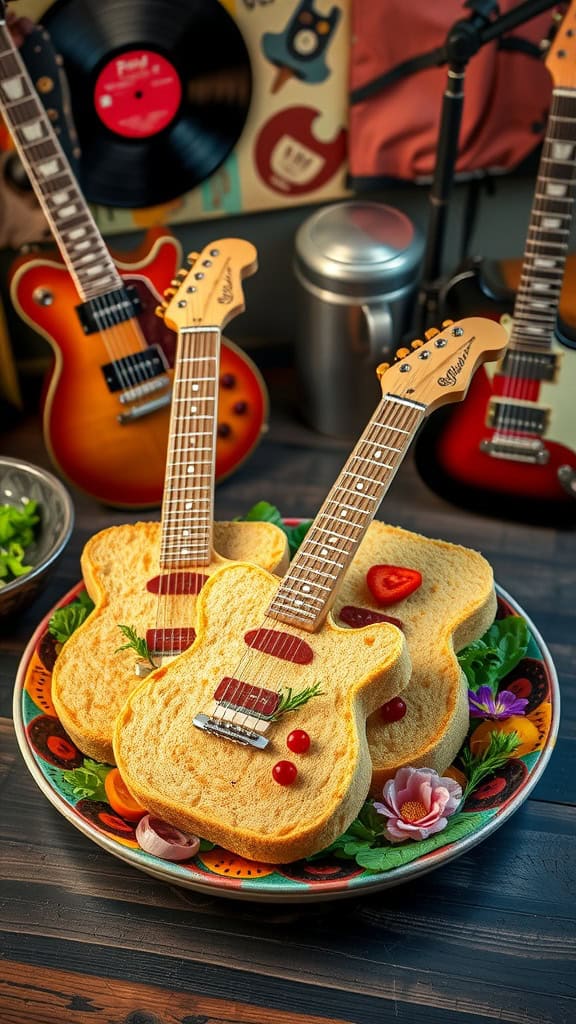
These guitar-shaped sandwiches are a fun and quirky addition to any rock and roll themed party! With a playful design that sparks creativity, they make for a delightful finger food that guests will love. The combination of soft bread and flavorful fillings makes these sandwiches as tasty as they are visually appealing.
Making these sandwiches is a breeze, perfect for busy hosts. Simply use cookie cutters to create guitar shapes, fill them with your choice of meats, cheeses, and veggies, and you’re all set! They’re not just good-looking; they’re also versatile and can cater to different tastes.
Ingredients
- 8 slices of bread (white or whole grain)
- 4 slices of cheese (your choice)
- 4 slices of deli meat (ham, turkey, or salami)
- 1/2 cup lettuce or spinach
- 1/4 cup mayonnaise or mustard
- Cherry tomatoes, halved (for decoration)
- Fresh herbs (like parsley or basil, for garnish)
Instructions
- Prepare the Bread: Use a guitar-shaped cookie cutter to cut out shapes from the slices of bread. You should get two shapes from each slice.
- Make the Filling: Spread mayonnaise or mustard on the inside of each bread shape. Layer cheese, meat, and lettuce on one piece of bread, then top with another bread shape.
- Add Decorations: Use halved cherry tomatoes and fresh herbs to decorate your guitars, adding a touch of color and fun.
- Serve: Arrange the sandwiches on a platter, and enjoy your rockstar-themed finger foods!
Microphone Cupcakes – A Sweet Hit For A Rock Party

These microphone cupcakes are a fun and delicious treat that will steal the show at any rock-themed party. With their vibrant colors and playful design, they not only taste great but also add a festive vibe to your celebration. The moist chocolate cupcakes are topped with swirls of colorful frosting that mimic the look of a microphone, making them perfect for a rock ‘n’ roll gathering.
Making these cupcakes is easy and enjoyable, even if you’re not a baking pro. You’ll love how quickly they come together, and your guests will appreciate the sweet flavors and adorable presentation. Get ready to rock the party with these tasty delights!
Ingredients
- 1 3/4 cups all-purpose flour
- 1 3/4 teaspoons baking powder
- 1/2 teaspoon salt
- 1 cup granulated sugar
- 1/2 cup unsalted butter, softened
- 2 large eggs
- 1 teaspoon vanilla extract
- 1 cup milk
- 1 cup chocolate frosting
- Food coloring (red, blue, yellow)
- Mini microphone toppers (can be made with fondant or purchased)
Instructions
- Preheat the oven to 350°F (175°C). Line a muffin tin with cupcake liners.
- In a bowl, combine flour, baking powder, and salt. In a separate bowl, beat together butter and sugar until fluffy. Add eggs and vanilla, mixing well.
- Gradually add the dry ingredients to the wet mixture, alternating with the milk. Mix until just combined.
- Divide the batter evenly among the cupcake liners and bake for 18-20 minutes, or until a toothpick inserted comes out clean. Allow to cool completely.
- Once cooled, use food coloring to color the frosting in red, blue, and yellow. Pipe the frosting onto the cupcakes in a swirl, creating a colorful microphone look.
- Top each cupcake with a mini microphone topper and serve at your party!
Born To Rock Sliders – Mini Burgers For A Rockstar Bash

Born to Rock Sliders are the ultimate mini burgers that bring a burst of flavor to your party table. These bite-sized delights are packed with juicy beef patties, melted cheddar cheese, fresh toppings, and a soft, toasted bun. They’re not just tasty; they’re easy to whip up, making them a perfect choice for your rockstar bash.
With each slider, you get the classic burger experience without the fuss of large portions. Customize them with your favorite toppings, whether you prefer crispy onions, fresh lettuce, or zesty pickles. Get ready to impress your guests with this fun and flavorful treat!
Ingredients
- 1 pound ground beef
- 1 cup shredded cheddar cheese
- 12 slider buns
- 1/2 cup sliced red onions
- 1 cup lettuce, shredded
- 1/4 cup pickles, sliced
- Salt and pepper to taste
- 1 tablespoon olive oil
Instructions
- Prepare the Patties: In a bowl, mix ground beef with salt and pepper. Form into 12 small patties.
- Cook the Patties: Heat olive oil in a skillet over medium heat. Cook the patties for about 3-4 minutes on each side or until they reach your desired doneness.
- Add Cheese: In the last minute of cooking, place a slice of cheddar cheese on each patty and cover the skillet until the cheese melts.
- Assemble the Sliders: Place each cheesy patty on a slider bun, then top with shredded lettuce, sliced onions, and pickles.
- Serve: Enjoy your sliders with a side of fries or your favorite dipping sauces!
Sticky Fingaz Chicken Wings – A Finger-Lickin’ Good Rock Party Snack
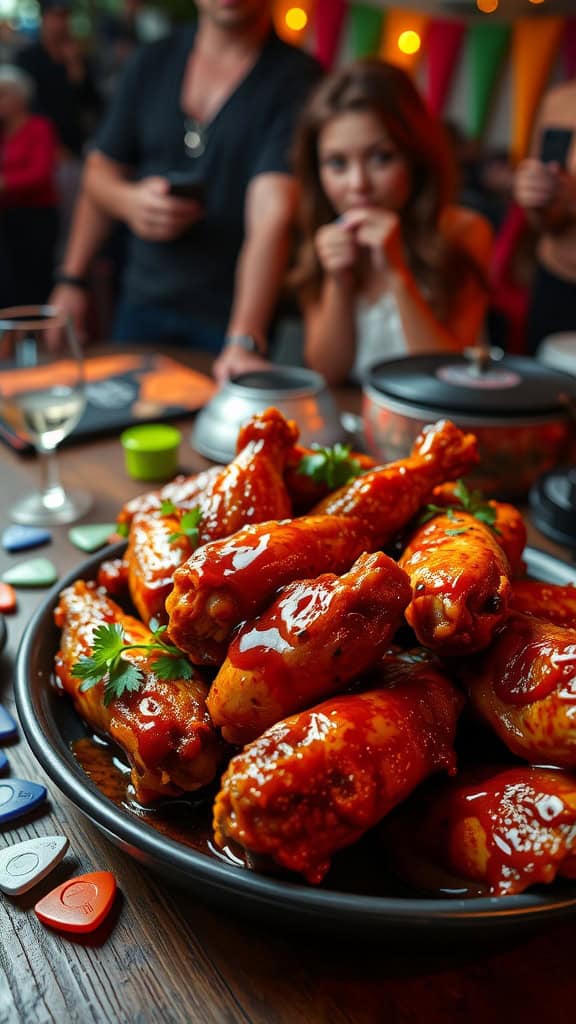
Sticky Fingaz Chicken Wings are the ultimate finger food for your rock and roll-themed party. These wings are coated in a sweet and spicy glaze that packs a punch. They are tender, juicy, and loaded with flavor, making them a hit with everyone. Plus, they are simple to prepare, so you can focus on enjoying the music and your friends!
Not only do these chicken wings taste amazing, but they also have that sticky quality that makes them incredibly fun to eat. Whether you serve them with a side of crunchy veggies or a refreshing dip, they will be the star of the show. Prepare to rock your taste buds with this delicious recipe!
Ingredients
- 2 pounds chicken wings
- 1/4 cup soy sauce
- 1/4 cup honey
- 2 tablespoons hot sauce (adjust to taste)
- 2 cloves garlic, minced
- 1 tablespoon ginger, minced
- 1 tablespoon sesame oil
- 1 teaspoon black pepper
- Chopped green onions for garnish
Instructions
- Marinate the Wings: In a large bowl, combine soy sauce, honey, hot sauce, garlic, ginger, sesame oil, and black pepper. Add the chicken wings, ensuring they are well coated. Cover and marinate in the refrigerator for at least 1 hour, or overnight for more flavor.
- Preheat the Oven: Preheat your oven to 400°F (200°C). Line a baking sheet with aluminum foil for easy cleanup.
- Bake the Wings: Place the marinated wings on the prepared baking sheet in a single layer. Bake for 30-35 minutes, flipping halfway through, until wings are crispy and cooked through.
- Glaze the Wings: In the last 10 minutes of baking, brush the wings with additional marinade to create a sticky coating. Return to the oven until caramelized.
- Serve: Remove from the oven, garnish with chopped green onions, and serve hot. Enjoy your Sticky Fingaz Chicken Wings with your favorite dipping sauces!
Rockstar Nacho Bar – Loaded Nachos For A Rock N’ Roll Party

When it comes to party food, loaded nachos are a classic hit that always gets the crowd going. With crispy tortilla chips piled high with melted cheese, savory toppings, and zesty sauces, they’re a delicious way to bring a vibrant rock n’ roll vibe to your gathering. They’re also easy to customize, allowing everyone to build their own perfect nacho creation!
This nacho bar is all about fun and flavor. Set up a spread of toppings that includes everything from spicy jalapeños and tangy salsa to creamy guacamole and seasoned meat. The combination of flavors and textures makes every bite exciting. Plus, assembling your own nachos means guests can mix and match to their heart’s content!

Rolling Stones Pizza Bites are the ultimate snack for any rock and roll gathering. Easy to make and bursting with cheesy goodness, these bite-sized treats are perfect for sharing with friends. Each bite offers a delightful crunch paired with a savory filling, making them a crowd-pleaser at your next party.
Whether you’re a fan of classic pepperoni or prefer a mix of colorful veggies, these pizza bites are customizable to fit any palate. Serve them with your favorite dipping sauces for an extra kick. Let’s dive into how you can whip up this tasty snack!
Ingredients
- 1 package of refrigerated pizza dough
- 1 cup shredded mozzarella cheese
- 1/2 cup pepperoni, chopped
- 1/4 cup sliced bell peppers
- 1/4 cup sliced black olives
- 1 teaspoon dried oregano
- 1/2 teaspoon garlic powder
- 1 egg, beaten (for egg wash)
- Marinara sauce for dipping
Instructions
- Preheat the Oven: Preheat your oven to 400°F (200°C) and line a baking sheet with parchment paper.
- Prepare the Dough: Roll out the pizza dough on a floured surface and cut it into small squares (about 3×3 inches).
- Add the Filling: On each square, place a mix of mozzarella cheese, pepperoni, bell peppers, and black olives. Sprinkle with oregano and garlic powder.
- Seal the Bites: Fold the dough over the filling to form a triangle and press the edges to seal. Brush the tops with the beaten egg.
- Bake: Place the pizza bites on the prepared baking sheet and bake for 12-15 minutes, or until golden brown.
- Serve: Let them cool slightly before serving with marinara sauce for dipping.
Rock N’ Roll Cake Pops – Sweet Treats For A Rockstar Birthday

Rock N’ Roll Cake Pops are a fun and stylish treat that’s perfect for any rockstar-themed birthday party. These cake pops are not only sweet and delicious but are also easy to make, making them a hit with both kids and adults. Imagine biting into a moist, flavorful cake covered in a shiny candy coating, all while being inspired by the music and excitement of a rock concert!
The beauty of cake pops lies in their versatility. You can use different flavors of cake and various colors of candy melts to create pops that match your party’s theme. Plus, they’re portable, allowing your guests to rock out while enjoying a sugary treat!
Ingredients
- 1 box of cake mix (any flavor)
- 1 cup frosting (store-bought or homemade)
- 1 cup candy melts (in your choice of colors)
- Lollipop sticks
- Sprinkles or edible decorations (optional)
Instructions
- Bake the Cake: Prepare the cake mix according to package instructions and bake in a 9×13 inch pan. Once baked, let it cool completely.
- Crumb the Cake: Once the cake is cool, crumble it into a large bowl. Use your hands or a fork to break it into fine crumbs.
- Add the Frosting: Mix in the frosting with the cake crumbs until well combined. The mixture should be moist enough to hold together.
- Form the Balls: Scoop out small amounts of the mixture and roll them into balls, about 1 inch in diameter. Place them on a baking sheet lined with parchment paper.
- Chill: Refrigerate the cake balls for about 30 minutes to firm them up.
- Melt the Candy: While the cake balls are chilling, melt the candy melts according to package instructions.
- Dip and Decorate: Dip the end of each lollipop stick into the melted candy, then insert it into a cake ball. Next, dip the cake ball into the candy melts, making sure it’s fully coated. Place it back on the baking sheet and add sprinkles or edible decorations as desired.
- Let Set: Allow the cake pops to set at room temperature or in the fridge until the candy coating hardens.
Electric Guitar Quesadillas – A Music-Themed Party Favorite

Electric Guitar Quesadillas are a fun and tasty way to celebrate a rock and roll theme party! These cheesy, crispy treats are not only delicious but also easy to make, making them a hit among guests of all ages. With a combination of gooey cheese and your favorite fillings, they bring a festive vibe to any gathering.
These quesadillas are versatile too. You can customize them with veggies, meats, or even spice them up with jalapeños for an extra kick. Serve them with fresh salsa, guacamole, or sour cream for dipping, and you’ll have a party snack that keeps everyone coming back for more!
Ingredients
- 4 large flour tortillas
- 2 cups shredded cheese (cheddar or Monterey Jack)
- 1 cup cooked chicken or black beans (optional)
- 1/2 cup diced bell peppers
- 1/4 cup chopped onions
- 1 tablespoon olive oil
- 1/2 teaspoon garlic powder
- 1/2 teaspoon cumin
- Salt and pepper to taste
- Fresh cilantro for garnish
- Sour cream, salsa, or guacamole for serving
Instructions
- Prepare the Filling: In a skillet, heat olive oil over medium heat. Add the onions and bell peppers, cooking until softened. If using chicken or black beans, stir them in along with the garlic powder, cumin, salt, and pepper. Cook for an additional 2-3 minutes.
- Assemble the Quesadillas: Place one tortilla in a large skillet over medium heat. Sprinkle half of the cheese evenly over the tortilla, then layer on the filling mixture. Top with the remaining cheese and place a second tortilla on top.
- Cook the Quesadillas: Cook for 3-4 minutes on one side until golden brown. Carefully flip the quesadilla and cook for another 3-4 minutes until the cheese is melted and the other side is golden brown.
- Slice and Serve: Remove from the skillet and let cool for a minute before slicing into wedges. Garnish with fresh cilantro and serve with sour cream, salsa, or guacamole.
Rockstar Themed Fondue Station – Dip Into A Rock And Roll Dessert Table
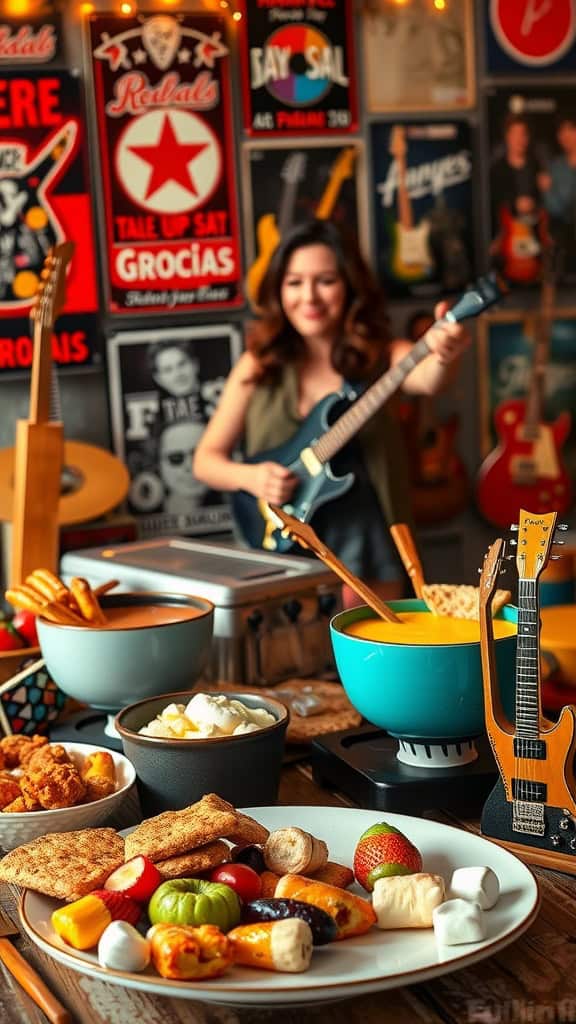
Create a fun and interactive dessert station that will have your guests rocking out while they indulge in delicious treats. A fondue station is not only simple to set up, but it also invites everyone to participate, making it a perfect addition to your rockstar-themed party. The blend of rich, melty chocolate or creamy cheese, paired with a variety of dippables, offers a delightful experience for all the senses.
Set up your fondue pots with a choice of chocolate or cheese fondue, and surround them with an array of dippable treats. From fresh fruits like strawberries and apples to crunchy pretzels and sponge cake, the choices are endless. This dessert table will be a hit, letting everyone create their perfect bite as they mingle and enjoy the rock and roll atmosphere.
Ingredients
- 1 cup heavy cream
- 2 cups chocolate chips (semisweet or milk chocolate)
- 1 tablespoon vanilla extract
- 1 loaf of pound cake, cut into cubes
- 1 cup strawberries, hulled
- 1 cup marshmallows
- 1 cup apple slices
- 1 cup pretzel sticks
- 1 cup graham crackers, broken into pieces
Instructions
- Prepare the Fondue: In a medium saucepan over low heat, combine heavy cream and chocolate chips. Stir continuously until the chocolate is fully melted and smooth. Add in the vanilla extract and mix well.
- Set Up the Station: Pour the chocolate fondue into a fondue pot to keep it warm. Arrange the dippable treats on a large platter, making it easy for guests to access.
- Serve and Enjoy: Provide skewers or forks for dipping. Encourage guests to get creative and mix different dippables together for a fun experience. Keep the fondue warm and ready for more dipping throughout the party.
Glam Rock Popcorn Bar – A Fun Snack For A Rock And Roll Bash

Turn your party into a rock star experience with a Glam Rock Popcorn Bar! This fun snack idea combines the classic crunch of popcorn with colorful toppings that guests can customize to their taste. It’s a delightful mix of sweet and savory, making it a hit for both adults and kids. Plus, setting it up is as simple as popping some corn and laying out a variety of toppings.
Imagine a vibrant table filled with popcorn in different flavors, glittery sprinkles, and tasty candies. Everyone can create their unique popcorn mix, making it not just a snack but a fun, interactive experience. Gather your friends and let the taste sensations begin!
Ingredients
- 8 cups popped popcorn
- 1 cup chocolate chips (milk or dark)
- 1 cup white chocolate chips
- 1/2 cup colorful sprinkles
- 1/2 cup mini marshmallows
- 1/2 cup crushed pretzels
- 1 cup candy-coated chocolates (like M&M’s)
- Salt to taste
Instructions
- Prepare the Popcorn: Pop the popcorn using an air popper or on the stove, and place it in a large bowl.
- Melt the Chocolate: In separate bowls, melt the chocolate chips in the microwave in 30-second intervals, stirring in between until smooth.
- Drizzle and Mix: Drizzle the melted chocolate over the popcorn and gently toss to coat evenly. Add salt to taste.
- Add Toppings: Sprinkle the colorful toppings, mini marshmallows, crushed pretzels, and candy-coated chocolates over the popcorn and mix again until everything is well-distributed.
- Serve and Enjoy: Transfer the popcorn to fun containers or bags for guests to grab and enjoy throughout the party!
Punk Rock Party Pretzels – Twisted Snacks With A Rockin’ Edge
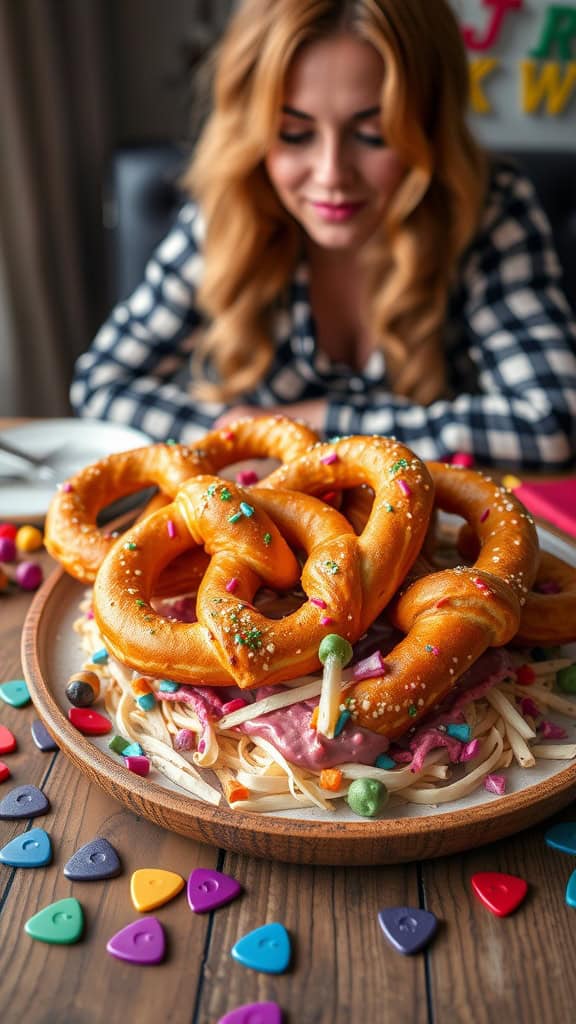
Punk Rock Party Pretzels are not just your average snack; they’re a fun, quirky twist on traditional pretzels that bring a playful edge to your gathering. These twisted snacks are soft, salty, and perfect for dipping, making them a crowd favorite at any punk rock-themed party. With a bit of creativity, you can add colorful sprinkles or toppings to give them a distinctive look that fits right in with the rebellious spirit of punk rock.
The best part? They’re simple to make! With just a few ingredients and easy steps, you’ll have a batch of fresh pretzels ready to rock. Serve them with an array of dips, or let guests customize their own with toppings that match their punk style. Get ready to punk up your party!
Ingredients
- 4 cups all-purpose flour
- 1 packet active dry yeast (2 1/4 teaspoons)
- 1/4 cup granulated sugar
- 1 teaspoon salt
- 1 1/2 cups warm water (110°F)
- 1/4 cup baking soda
- 1 large egg, beaten
- Coarse sea salt, for sprinkling
- Optional: colorful sprinkles or toppings
Instructions
- Activate the Yeast: In a large mixing bowl, combine warm water and sugar. Sprinkle yeast over the top and let it sit for about 5 minutes until foamy.
- Make the Dough: Add flour and salt to the yeast mixture. Stir until a rough dough forms, then knead on a floured surface for about 5-7 minutes until smooth and elastic.
- Shape the Pretzels: Divide the dough into equal pieces and roll each piece into a long rope. Twist the rope into a pretzel shape and place it on a baking sheet lined with parchment paper.
- Prepare the Baking Soda Bath: In a large pot, bring 10 cups of water to a boil and add the baking soda. Carefully dip each pretzel into the boiling solution for 30 seconds, then remove and place back on the baking sheet.
- Finish and Bake: Brush the pretzels with the beaten egg and sprinkle with coarse salt (and optional toppings). Bake in a preheated oven at 425°F (220°C) for 12-15 minutes until golden brown.
Rockin’ Bacon-Wrapped Drumsticks – Music Party Food With A Crunch
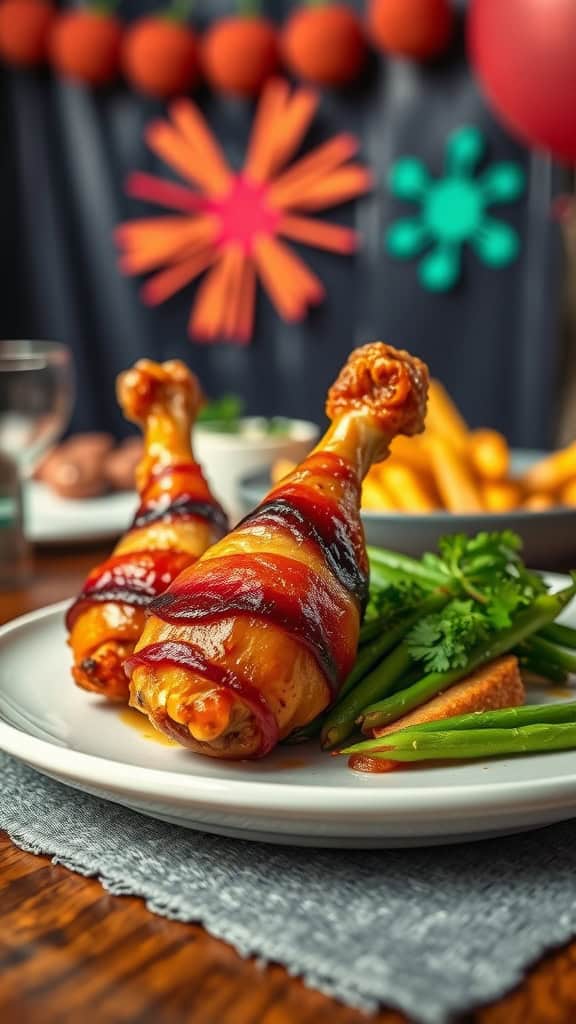
If you’re looking to add some fun and flavor to your rock and roll theme party, these bacon-wrapped drumsticks are just the ticket! They combine the savory crunch of crispy bacon with juicy chicken, creating a dish that’s full of flavor. Plus, they’re simple to make, making them a perfect choice for any gathering.
The combination of smokiness from the bacon and the tender chicken makes every bite a delight. Whether you’re rocking out with friends or just enjoying some good food, these drumsticks are sure to be a hit on your party table.
Ingredients
- 8 chicken drumsticks
- 12 slices of bacon
- 1/4 cup BBQ sauce
- 1 teaspoon garlic powder
- 1 teaspoon onion powder
- Salt and pepper to taste
Instructions
- Preheat your oven to 375°F (190°C).
- Season the chicken drumsticks with garlic powder, onion powder, salt, and pepper.
- Wrap each drumstick with a slice of bacon, securing the ends with a toothpick if necessary.
- Place the bacon-wrapped drumsticks on a baking sheet lined with parchment paper.
- Brush BBQ sauce over each drumstick, making sure to coat them well.
- Bake in the preheated oven for about 35-40 minutes, or until the bacon is crispy and the chicken is cooked through.
- Remove from the oven and let cool slightly before serving. Enjoy!
Classic Rock And Roll Candy Bar – Sweet Treats For A Music Birthday Party

If you’re throwing a rock and roll themed birthday party, a classic candy bar is a fun and easy way to satisfy your guests’ sweet tooth. This candy bar can feature a mix of colorful candies, chocolates, and decorated cookies that not only taste good but also add a vibrant touch to your celebration. The flavors will range from fruity and sweet to rich and chocolaty, creating a delightful experience for everyone.
Setting up this candy bar is simple and requires minimal preparation. You can customize it with your favorite treats, ensuring that there’s something for everyone. Plus, it’s a great way to incorporate music-themed elements into your dessert table, making it perfect for a birthday party filled with rock vibes!
Ingredients
- 2 cups all-purpose flour
- 1 cup granulated sugar
- 1/2 cup unsalted butter, softened
- 1 large egg
- 1 teaspoon vanilla extract
- 1 teaspoon baking powder
- 1/2 teaspoon salt
- 1 cup colorful candy-coated chocolates
- 1 cup chocolate chips
- 1 cup assorted gummies or fruit candies
Instructions
- Make the Cookie Dough: In a large bowl, cream together the softened butter and sugar until fluffy. Add the egg and vanilla extract, mixing well. In another bowl, combine flour, baking powder, and salt, then gradually add the dry ingredients to the wet mixture until a dough forms.
- Shape and Bake: Preheat your oven to 350°F (175°C). Roll the dough into small balls and place them on a baking sheet lined with parchment paper. Flatten each ball slightly and press colorful candy-coated chocolates into the top of each cookie.
- Bake the Cookies: Bake for about 10-12 minutes or until the edges are lightly golden. Let them cool on the baking sheet for a few minutes before transferring to a wire rack to cool completely.
- Assemble the Candy Bar: Once your cookies are cool, arrange them on a platter along with bowls of chocolate chips, gummies, and other candies. Feel free to add fun decorations like music notes or mini guitars to enhance the rock and roll theme!
Guitar Pick Cookies – A Rock And Roll Themed Dessert Idea
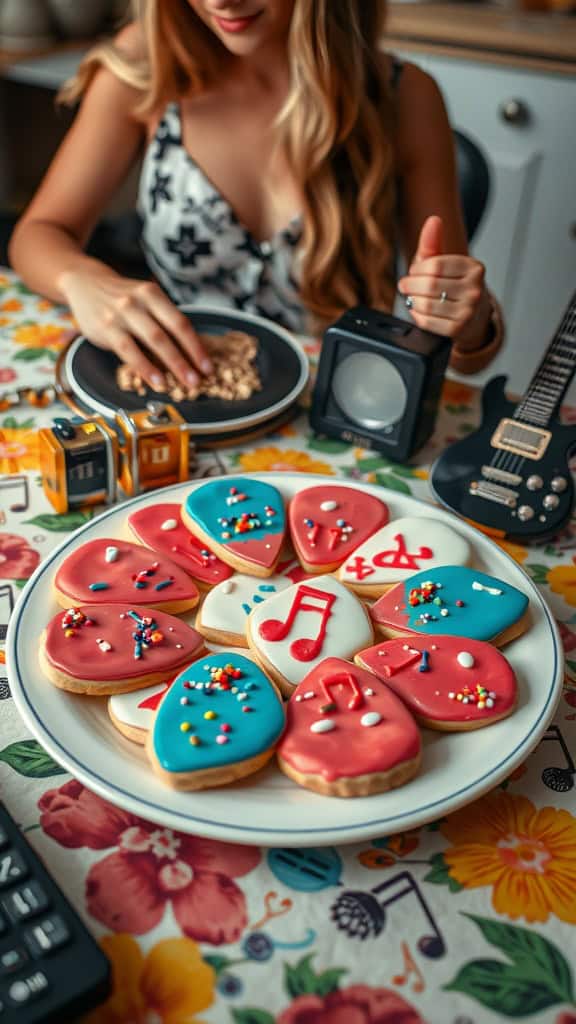
If you’re looking for a fun and tasty way to celebrate a rock and roll theme party, guitar pick cookies are the way to go. These delightful treats are not only visually appealing but also delicious, combining a buttery flavor with a hint of sweetness. They are surprisingly simple to make, perfect for both budding bakers and seasoned pros.
These cookies can be customized with colorful icing and fun musical decorations, making them a hit at any gathering. Whether you’re hosting a birthday bash or a casual get-together, these guitar pick cookies will strike the right chord with your guests!
Ingredients
- 2 ¾ cups all-purpose flour
- 1 teaspoon baking powder
- ½ teaspoon salt
- 1 cup unsalted butter, softened
- 1 cup granulated sugar
- 1 large egg
- 1 teaspoon vanilla extract
- 1 teaspoon almond extract
- Royal icing in various colors
- Sprinkles and edible decorations
Instructions
- Make the Dough: In a bowl, whisk together the flour, baking powder, and salt. In another bowl, cream the butter and sugar until light and fluffy. Beat in the egg, vanilla, and almond extract. Gradually add the flour mixture until combined.
- Shape and Chill: Divide the dough into two discs, wrap in plastic, and refrigerate for at least one hour.
- Cut the Cookies: Preheat the oven to 350°F (175°C). Roll out the chilled dough on a floured surface to about ¼ inch thick. Use a guitar pick-shaped cookie cutter to cut out the cookies and place them on a baking sheet lined with parchment paper.
- Bake: Bake for about 8-10 minutes or until the edges are lightly golden. Allow the cookies to cool completely on a wire rack.
- Decorate: Once cooled, use royal icing to decorate the cookies. Get creative with colors, musical notes, or even small edible glitter for that extra flair!
Heavy Metal Meatballs – A Savory Hit For A Rockstar Party

Heavy Metal Meatballs are a bold dish that will steal the show at your rock-themed gathering. These juicy, flavorful meatballs are slathered in a rich, tangy sauce that packs a punch. Perfect for those who appreciate savory flavors, they are also surprisingly simple to make, ensuring you can spend more time enjoying the party and less time in the kitchen.
Served on a bed of pasta or as bite-sized appetizers on toothpicks, these meatballs are sure to impress your guests. With a combination of tender meat, zesty spices, and a touch of sweetness, it’s a hearty option that resonates with the heavy metal vibe. Let’s dive into the recipe!
Ingredients
- 1 pound ground beef
- 1/2 cup breadcrumbs
- 1/4 cup grated Parmesan cheese
- 1 large egg
- 2 cloves garlic, minced
- 1 teaspoon onion powder
- 1 teaspoon Italian seasoning
- Salt and pepper to taste
- 1 cup ketchup
- 1/4 cup brown sugar
- 1 tablespoon Worcestershire sauce
- 1 tablespoon mustard
Instructions
- Preheat the Oven: Start by preheating your oven to 375°F (190°C).
- Mix the Meatball Ingredients: In a large bowl, combine ground beef, breadcrumbs, Parmesan cheese, egg, garlic, onion powder, Italian seasoning, salt, and pepper. Mix until well incorporated.
- Form the Meatballs: Roll the mixture into bite-sized balls and place them on a baking sheet lined with parchment paper.
- Prepare the Sauce: In a separate bowl, mix ketchup, brown sugar, Worcestershire sauce, and mustard until smooth.
- Bake and Glaze: Pour half of the sauce over the meatballs, reserving the other half. Bake for 20 minutes, then remove and brush with the remaining sauce. Return to the oven for an additional 10 minutes.
- Serve: Once cooked through, remove the meatballs from the oven and let them cool slightly. Serve warm on a platter with toothpicks for easy snacking.
Vinyl Record Oreos – Rock N’ Roll Birthday Party Snack Idea

Vinyl Record Oreos are a fun and tasty treat that perfectly fits the vibe of any rock and roll-themed party. With their playful design and rich, creamy flavor, these cookies are sure to be a hit among guests of all ages. The great thing is, they’re super easy to make, so you can spend more time enjoying the party than in the kitchen!
This recipe combines classic Oreos with a touch of creativity to mimic vinyl records, making them not only delicious but also visually appealing. These treats are great for adding a personal touch to your celebration, and they pair wonderfully with all your favorite rock music!
Ingredients
- 1 package of Oreo cookies
- 1 cup of black candy melts
- Assorted colored candy melts for decorations
- Edible glitter (optional)
- 1 tablespoon of vegetable oil (for thinning the candy melts)
Instructions
- Melt the black candy melts in a microwave-safe bowl, adding vegetable oil to thin if needed.
- Dip each Oreo cookie halfway into the melted black candy melts, allowing the excess to drip off.
- Place the dipped Oreos on a baking sheet lined with parchment paper to set.
- Once the black coating has hardened, use the colored candy melts to create fun designs on top, resembling record labels.
- Optionally, sprinkle with edible glitter for a bit of flair.
- Let everything cool completely before serving at your rock-themed party!
Rock And Roll Cupcake Tower – Music-Themed Dessert Table Must-Have
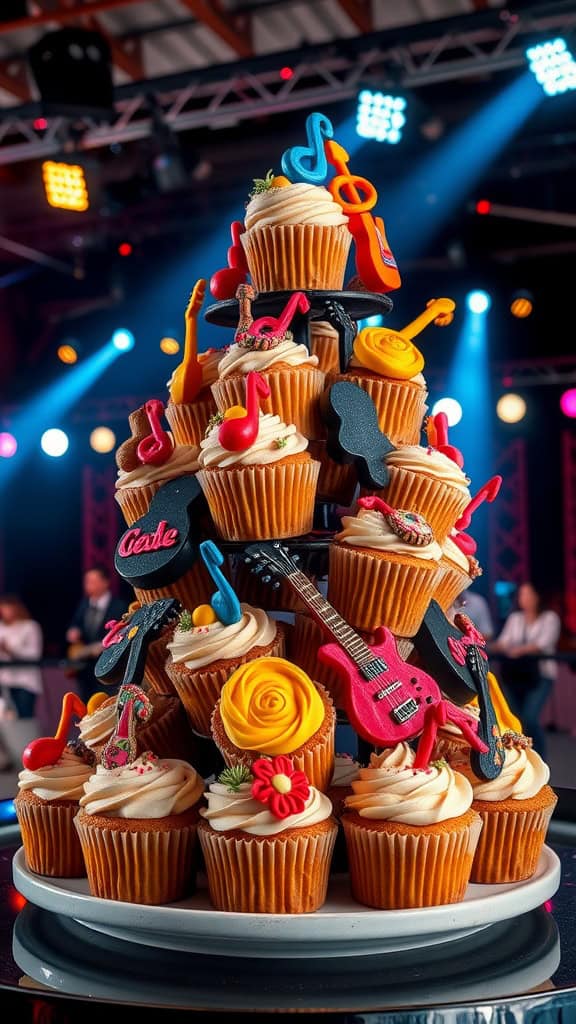
Get ready to rock your party with a vibrant cupcake tower that brings a burst of color and flavor to the dessert table! These delightful cupcakes are not only fun to look at but also a joy to eat, featuring a classic vanilla base topped with fluffy buttercream frosting. The cupcake tower is simple to assemble, making it an enjoyable project for bakers of all skill levels.
Add a musical twist with playful decorations like edible musical notes and guitar toppers. These cupcakes will not only satisfy your sweet tooth but also elevate your rock and roll theme, making them a hit among guests of all ages.
Ingredients
- 2 cups all-purpose flour
- 1 1/2 tsp baking powder
- 1/2 tsp baking soda
- 1/2 tsp salt
- 1 cup unsalted butter, softened
- 2 cups granulated sugar
- 4 large eggs
- 1 tbsp vanilla extract
- 1 cup buttermilk
- 3 cups buttercream frosting (store-bought or homemade)
- Colorful edible decorations (musical notes, guitars, etc.)
Instructions
- Preheat the oven to 350°F (175°C) and line a cupcake pan with cupcake liners.
- In a bowl, whisk together flour, baking powder, baking soda, and salt. Set aside.
- In a large mixing bowl, cream together the softened butter and granulated sugar until light and fluffy. Add the eggs one at a time, mixing well after each addition. Stir in the vanilla extract.
- Gradually add the dry ingredients to the butter mixture, alternating with buttermilk, starting and ending with the flour mixture. Mix until just combined.
- Fill each cupcake liner about two-thirds full with batter and bake for 18-20 minutes, or until a toothpick inserted in the center comes out clean. Allow them to cool completely.
- Once cooled, pipe buttercream frosting onto each cupcake and decorate with your edible musical notes and guitar toppers to complete the rock and roll theme.
80S Rockstar Party Nachos – A Bold Flavor For A Rock N’ Roll Theme Party

These 80s Rockstar Party Nachos pack a punch with bold flavors and plenty of textures. Perfect for a rock n’ roll theme party, this dish combines crispy tortilla chips with a medley of toppings that will have everyone singing your praises. With a little bit of heat and a whole lot of fun, it’s a simple recipe that even beginner cooks can master!
Imagine layers of crunchy goodness topped with melted cheese, zesty jalapeños, fresh veggies, and savory proteins. It’s not just food; it’s an experience. Get ready to rock the party with these nachos that are as vibrant as the music from the 80s!
Ingredients
- 1 bag of tortilla chips
- 2 cups shredded cheddar cheese
- 1 cup cooked, crumbled chorizo or ground beef
- 1 cup black beans, drained and rinsed
- 1 cup diced tomatoes
- 1/2 cup sliced jalapeños
- 1/4 cup chopped fresh cilantro
- 1/2 cup sour cream
- 1 avocado, diced
- 1 teaspoon taco seasoning
Instructions
- Preheat your oven to 350°F (175°C).
- Spread the tortilla chips evenly on a large baking sheet.
- Sprinkle the cooked chorizo or ground beef over the chips.
- Add the black beans, diced tomatoes, and jalapeños, distributing them evenly.
- Top with shredded cheddar cheese and optional taco seasoning for extra flavor.
- Bake in the oven for about 10-15 minutes, or until the cheese is melted and bubbly.
- Remove from the oven and garnish with diced avocado and fresh cilantro.
- Serve hot with a side of sour cream for dipping.
Kiss Band Blackout Brownies – Sweet And Decadent Rockstar Treats
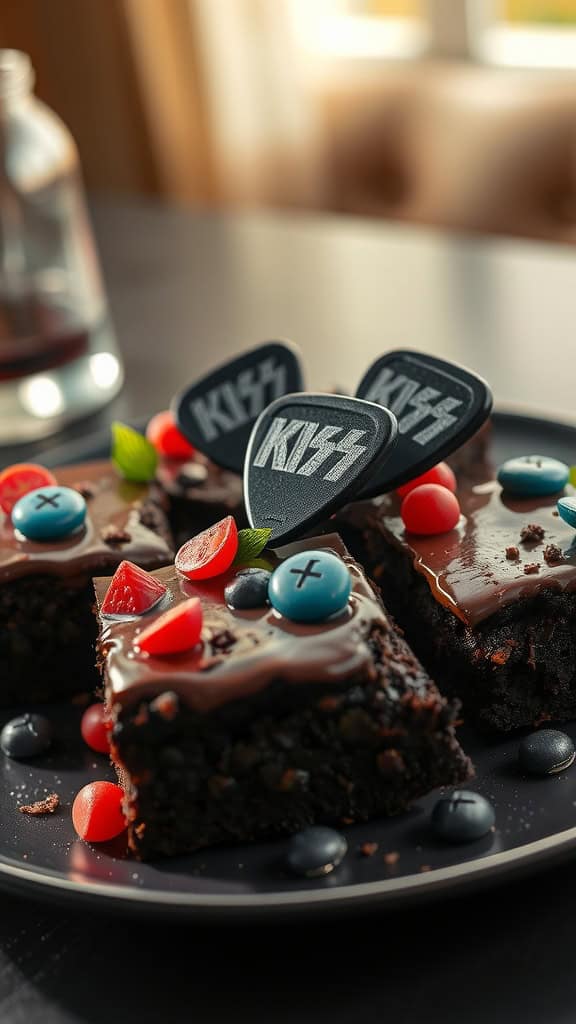
Get ready to rock your taste buds with these Kiss Band Blackout Brownies! These rich, chocolatey delights are perfect for any rock and roll-themed party. They offer a deep, fudgy flavor that chocolate lovers will adore, making them a sweet addition to your celebration. Plus, they’re simple to whip up, so you can spend less time in the kitchen and more time enjoying the music.
The brownies are topped with a shiny chocolate glaze and decorated with colorful candies, giving them a fun and festive appearance. They not only taste amazing but also look the part, making them an eye-catching treat on your dessert table. Let’s dive into the recipe!
Ingredients
- 1 cup unsalted butter
- 2 cups granulated sugar
- 4 large eggs
- 1 teaspoon vanilla extract
- 1 cup all-purpose flour
- 1 cup unsweetened cocoa powder
- 1/2 teaspoon salt
- 1 cup chocolate chips
- 1/2 cup assorted candies for decoration
Instructions
- Preheat your oven to 350°F (175°C) and grease a 9×13-inch baking dish.
- In a saucepan, melt the butter over medium heat. Once melted, remove it from the heat and stir in the sugar until well combined.
- Add the eggs one at a time, mixing well after each addition. Stir in the vanilla extract.
- In a separate bowl, combine the flour, cocoa powder, and salt. Gradually add this dry mixture to the wet ingredients, stirring until just combined. Fold in the chocolate chips.
- Pour the batter into the prepared baking dish and spread it evenly. Bake for 25-30 minutes or until a toothpick inserted in the center comes out mostly clean.
- Let the brownies cool completely before frosting. Once cooled, spread a layer of chocolate glaze on top and decorate with assorted candies.
Rock Star Candy Table – Colorful Sweets For A Music Birthday Bash

Planning a music-themed birthday bash? A colorful candy table is the perfect centerpiece to excite your guests! This sweet display is not only visually appealing but also incredibly easy to create. Imagine vibrant jelly beans, gummy candies, and lollipops arranged like a rock star’s stage, captivating everyone who walks by.
With a variety of flavors and textures, this candy table will please every sweet tooth. It’s a fun way to add a burst of color to your party and is simple enough to whip up in no time. Just gather your favorite candies, arrange them creatively, and watch your guests enjoy the sugary treats!
Ingredients
- 2 cups gummy bears
- 1 cup jelly beans
- 1 cup sour gummies
- 1 cup chocolate-covered pretzels
- 1 cup lollipops
- 1 cup rock candy
- Assorted colorful trays and containers for display
Instructions
- Select a large table or surface to set up your candy display.
- Start by arranging your trays and containers by color or type for an organized look.
- Fill each container with your selected candies, mixing different shapes and colors together.
- Add some fun elements like lollipops sticking out of the candy piles for height and interest.
- Consider adding themed decorations like mini guitars or music notes to enhance the rock star vibe.
- Once everything is arranged, invite your guests to enjoy the colorful candy selection!
Mic Drop Mini Cheesecakes – A Rockstar Themed Food Favorite
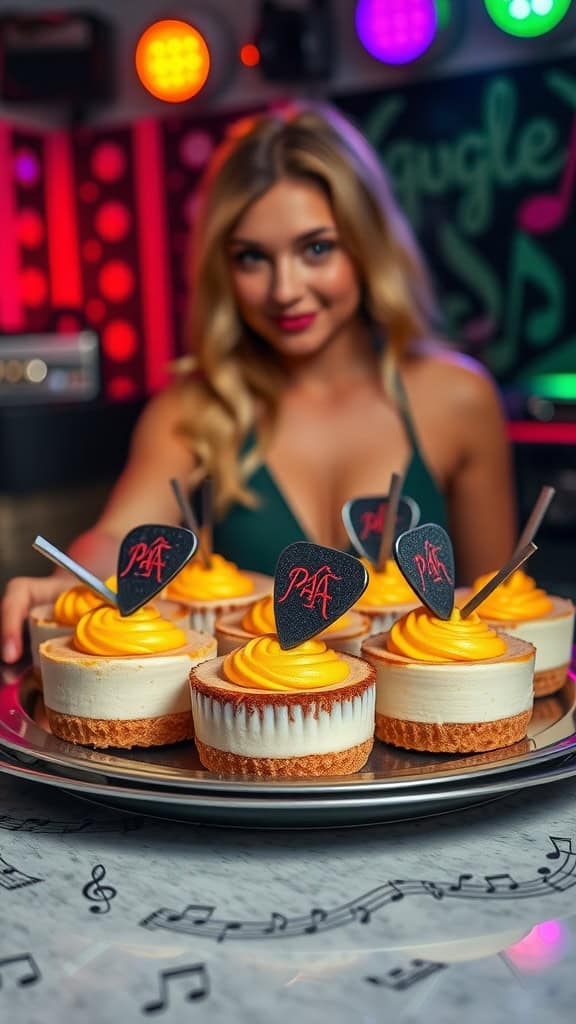
Mic Drop Mini Cheesecakes bring a sweet twist to your rock and roll theme party. These delightful bites are creamy, rich, and topped with a vibrant burst of flavor, making them a crowd-pleaser. They are not only easy to whip up but also add a fun bite-sized treat that your guests will love.
With their smooth texture and the perfect balance of sweetness, these mini cheesecakes are sure to be a hit. You can customize the toppings to match your party’s vibe, whether it’s a classic fruit topping or a thumping chocolate drizzle. Get ready to rock out with these tasty desserts!
Ingredients
- 1 cup graham cracker crumbs
- 1/4 cup granulated sugar
- 1/2 cup unsalted butter, melted
- 16 oz cream cheese, softened
- 1 cup powdered sugar
- 2 teaspoons vanilla extract
- 2 large eggs
- 1 cup sour cream
- 1/4 cup lemon juice
- Fresh fruit or chocolate for topping
Instructions
- Preheat the oven to 325°F (160°C) and line a muffin tin with paper liners.
- In a bowl, combine graham cracker crumbs, sugar, and melted butter. Mix until well combined and press the mixture firmly into the bottom of each muffin liner.
- In a mixing bowl, beat the cream cheese until smooth. Gradually add powdered sugar, vanilla, and mix until combined.
- Add the eggs, one at a time, mixing on low speed until just combined. Then incorporate the sour cream and lemon juice until the mixture is smooth.
- Pour the cheesecake batter over the crusts, filling each liner about 3/4 full. Bake for about 20-25 minutes or until the centers are set but slightly jiggly.
- Allow the cheesecakes to cool at room temperature, then refrigerate for at least 4 hours before serving. Top with fresh fruit or chocolate before enjoying.
Born To Rock Party Donuts – A Sweet Hit For A Rock And Roll Birthday

These Born To Rock Party Donuts are not just any dessert; they’re a fun, colorful way to celebrate! With their vibrant icing and playful decorations, these donuts will surely grab attention at any rock and roll themed birthday bash. The blend of sweet flavors and soft textures makes them a hit among all ages, offering a delightful treat that’s easy to eat while jamming to your favorite tunes.
Making these donuts is simple and can be a fun activity to involve the kids or friends. You can customize the toppings to fit your party’s color scheme or theme, ensuring each donut is as unique as a rock legend. Grab your ingredients and get ready to rock out with these sweet, festive treats!
Ingredients
- 2 cups all-purpose flour
- 1/2 cup granulated sugar
- 2 teaspoons baking powder
- 1/2 teaspoon salt
- 1/2 cup milk
- 2 large eggs
- 1/4 cup unsalted butter, melted
- 1 teaspoon vanilla extract
- 1 cup powdered sugar
- 2 tablespoons milk (for icing)
- Food coloring (various colors)
- Sprinkles, edible glitter, or other decorations
Instructions
- Preheat the Oven: Start by preheating your oven to 375°F (190°C) and greasing a donut pan.
- Mix the Dry Ingredients: In a large bowl, whisk together the flour, sugar, baking powder, and salt.
- Combine Wet Ingredients: In another bowl, mix the milk, eggs, melted butter, and vanilla extract until well combined.
- Combine Mixtures: Gradually add the wet ingredients to the dry ingredients, stirring until just combined (do not overmix).
- Fill the Pan: Spoon the batter into the prepared donut pan, filling each cavity about halfway.
- Bake: Bake for 10-12 minutes or until the donuts are golden and a toothpick comes out clean. Let them cool in the pan for a few minutes before transferring to a wire rack.
- Prepare the Icing: In a small bowl, mix the powdered sugar with 2 tablespoons of milk and add food coloring to achieve your desired shades.
- Decorate: Once the donuts are cool, dip the tops in the icing and sprinkle with your favorite toppings.
- Serve and Enjoy: Display your colorful donuts on a platter and watch them disappear as everyone enjoys a sweet taste of rock and roll!
Rocker S’Mores Station – Music Themed Party Food For A Sweet Finish

If you’re looking to add a fun and sweet touch to your rock and roll themed party, a S’Mores station is a great idea. These gooey treats combine crunchy graham crackers, melty chocolate, and toasted marshmallows, making them a delightful end to any gathering. This setup is not only delicious but also interactive, allowing guests to create their own custom S’Mores and enjoy the process.
Setting up the S’Mores station is super simple. Just gather your ingredients and let everyone build their perfect treat. It’s a casual and friendly way to cap off your night, and the combination of flavors and textures will have everyone coming back for more!
Ingredients
- Graham crackers
- Marshmallows
- Chocolate bars (milk, dark, or even flavored)
- Candy toppings (like crushed Oreos or nuts)
- Skewers (for toasting marshmallows)
Instructions
- Set Up the Station: Arrange graham crackers, chocolate bars, and marshmallows on a table. Include a fire source like a tabletop s’mores maker or a safe outdoor fire pit.
- Toast the Marshmallows: Skewer a marshmallow and hold it over the flame until it’s golden brown and gooey.
- Assemble the S’Mores: Place the toasted marshmallow between two graham crackers along with a piece of chocolate. Add any candy toppings if desired.
- Enjoy: Squeeze the graham crackers together, let the chocolate melt a bit, and dig in!
Headbanger Hot Dogs – Classic Rock And Roll Party Food With A Twist
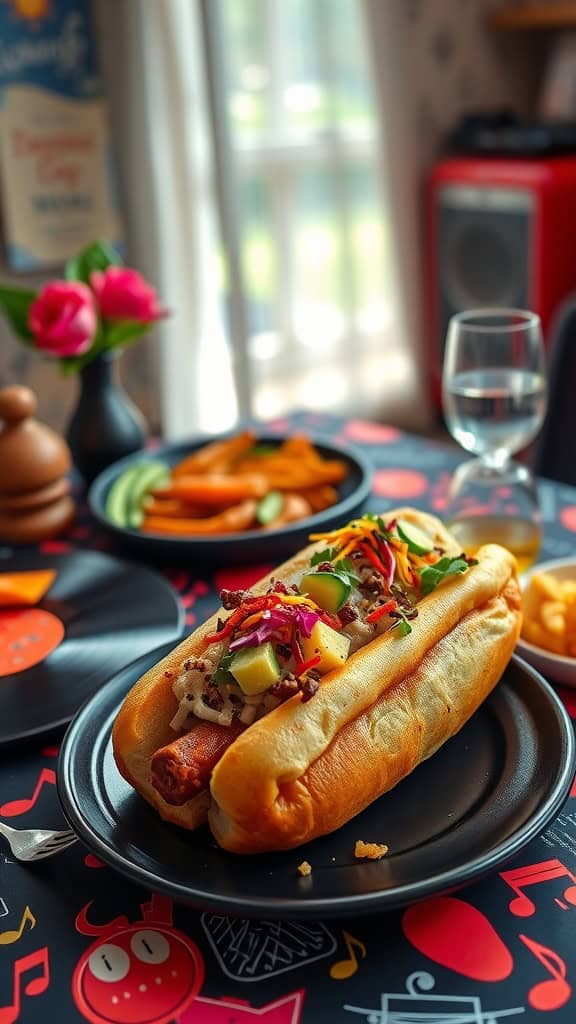
Headbanger Hot Dogs take the classic ballpark favorite and amp it up for your rock and roll theme party. These hot dogs are bursting with flavor, featuring a medley of toppings that give a nod to the boldness of rock music. The combination of savory ingredients makes each bite a flavorful experience, perfect for any gathering.
Making these hot dogs is simple and quick, making them ideal for parties. You can customize the toppings to suit your taste or the theme of your party. Whether you’re a fan of spicy jalapeños or prefer a fresh crunch from cucumbers, there’s a topping for everyone.
Ingredients
- 4 hot dogs
- 4 hot dog buns
- 1/2 cup shredded cheddar cheese
- 1/4 cup diced onions
- 1/4 cup diced pickles
- 1/4 cup jalapeños, sliced
- 1/4 cup coleslaw mix
- 2 tablespoons barbecue sauce
- 1 tablespoon chopped fresh cilantro
Instructions
- Cook the Hot Dogs: Grill or boil the hot dogs according to package instructions until heated through.
- Prepare the Buns: Lightly toast the hot dog buns on the grill or in a toaster for added texture.
- Assemble the Hot Dogs: Place each hot dog in a bun. Top with shredded cheddar cheese, diced onions, pickles, jalapeños, and coleslaw mix.
- Add the Finishing Touches: Drizzle with barbecue sauce and sprinkle with fresh cilantro to enhance the flavor.
- Serve and Enjoy: Serve the Headbanger Hot Dogs immediately while they’re hot, and let the party vibe kick in!